Note for Acer AspireOne 751 (11.6"):

Note for Acer AspireOne 751 (11.6"): With this variant, the right graphics resolution (1366x768) does not work out of the box. Do the following to intall another graphics driver:

  • add the following line at the end of /etc/apt/sources.list:

    deb http://ppa.launchpad.net/ubuntu-mobile/ppa/ubuntu jaunty main

  • execute the following commands from command line:
    • sudo gpg –keyserver keyserver.ubuntu.com –recv 0×99d6b21cc6598a30; sudo apt-get update; sudo apt-get install xserver-xorg-video-psb
  • reboot

Spamassasin configuration

We have already discussed how to install mail server with postfix+Devcot+SASL+Squirrel Mail in this article we will see how to add spam filter for postfix mail server.

Apache SpamAssassin is an extensible email filter that is used to identify spam. Once identified, the mail can then be optionally tagged as spam for later filtering. It provides a command line tool to perform filtering, a client-server system to filter large volumes of mail, and Mail::SpamAssassin, a set of Perl modules allowing Apache SpamAssassin to be used in a wide variety of email systems.


Install Spamassassin in Debian

#apt-get install spamassassin spamc

spamassassin package can also be integrated into a Mail Transport Agent such as postfix.

Preparation

By default Spamassassin will run as root users when you install from debian repository and is not started to avoid that, we are going to create a specific user and group for spamassassin.

#groupadd -g 5001 spamd

#useradd -u 5001 -g spamd -s /sbin/nologin -d /var/lib/spamassassin spamd

#mkdir /var/lib/spamassassin

#chown spamd:spamd /var/lib/spamassassin

we need to change some settings in /etc/default/spamassassin and make sure you get the following values

ENABLED=1
SAHOME=”/var/lib/spamassassin/”
OPTIONS="--create-prefs --max-children 5 --username spamd --helper-home-dir ${SAHOME} -s ${SAHOME}spamd.log"
PIDFILE=”${SAHOME}spamd.pid”

We are going to run spamd daemon as user spamd and make it use its own home dir (/var/lib/spamassassin/) and is going to output its logs in /var/lib/spamassassin/spamd.log

spamassassin Configuration

we need to give spamassassin some rules. The default settings are quite fine, but you might tweak them up a bit. So let’s edit /etc/spamassassin/local.cf and make it looks like that

#vi /etc/spamassassin/local.cf

Modify this file looks like below

rewrite_header Subject [***** SPAM _SCORE_ *****]
required_score 2.0
#to be able to use _SCORE_ we need report_safe set to 0
#If this option is set to 0, incoming spam is only modified by adding some “X-Spam-” headers and no changes will be made to the body.
report_safe 0

# Enable the Bayes system
use_bayes 1
use_bayes_rules 1
# Enable Bayes auto-learning
bayes_auto_learn 1

# Enable or disable network checks
skip_rbl_checks 0
use_razor2 0
use_dcc 0
use_pyzor 0

we set spamassassin’ spamd default settings to rewrite email subject to [***** SPAM _SCORE_ *****], where _SCORE_ is the score attributed to the email by spamassassin after running different tests, only if the actual score is greater or equal to 2.0. So email with a score lower than 2 won’t be modified.

To be able to use the _SCORE_ in the rewrite_header directive, we need to set report_safe to 0.

In the next section, we tell spamassassin to use bayes classifier and to improve itself by auto-learning from the messages it will analyse.

In the last section, we disable collaborative network such as pyzor, razor2 and dcc. Those collaborative network keep an up-to-date catalogue of know mail checksum to be recognized as spam. Those might be interresting to use, but I’m not going to use them here as I found it took long enough to spamassassin to deal with spams only using it rules.

Restart spamassassin using the following command

#/etc/init.d/spamassassin start

Configuring Postfix call Spamassassin

spamassassin will be invoked only once postfix has finished with the email.

To tell postfix to use spamassassin, we are going to edit /etc/postfix/master.cf

#vi /etc/postfix/master.cf

Change the following line

smtp inet n - - - - smtpd

to

smtp inet n - - - - smtpd
-o content_filter=spamassassin

and then, at the end of master.cf file add the following lines

spamassassin unix - n n - - pipe

user=spamd argv=/usr/bin/spamc -f -e
/usr/sbin/sendmail -oi -f ${sender} ${recipient}

Save and exit the file

That’s it our spam filter is setted up, we need to reload postfix settings and everything should be ready.

#/etc/init.d/postfix reload

wget: Download entire websites easy

wget is a nice tool for downloading resources from the internet. The basic usage is wget url:

wget http://linuxreviews.org/

Therefore, wget (manual page) + less (manual page) is all you need to surf the internet. The power of wget is that you may download sites recursive, meaning you also get all pages (and images and other data) linked on the front page:

wget -r http://linuxreviews.org/

But many sites do not want you to download their entire site. To prevent this, they check how browsers identify. Many sites refuses you to connect or sends a blank page if they detect you are not using a web-browser. You might get a message like:

Sorry, but the download manager you are using to view this site is not supported. We do not support use of such download managers as flashget, go!zilla, or getright

Wget has a very handy -U option for sites like this. Use -U My-browser to tell the site you are using some commonly accepted browser:

  wget  -r -p -U Mozilla http://www.stupidsite.com/restricedplace.html

The most important command line options are --limit-rate= and --wait=. You should add --wait=20 to pause 20 seconds between retrievals, this makes sure you are not manually added to a blacklist. --limit-rate defaults to bytes, add K to set KB/s. Example:

wget --wait=20 --limit-rate=20K -r -p -U Mozilla http://www.stupidsite.com/restricedplace.html

A web-site owner will probably get upset if you attempt to download his entire site using a simple wget http://foo.bar command. However, the web-site owner will not even notice you if you limit the download transfer rate and pause between fetching files.

Use --no-parent

--no-parent is a very handy option that guarantees wget will not download anything from the folders beneath the folder you want to acquire. Use this to make sure wget does not fetch more than it needs to if just just want to download the files in a folder.

How can I get my videos to play?

Some video formats, such as Flash, QuickTime, and Windows Media Video, are proprietary and so support for them cannot be included in Ubuntu by default. You must install some extra software to allow playback.

In order to play the most common proprietary formats in the Totem movie player or Firefox web browser, install the ubuntu-restricted-extras package (see Restricted Software for more information).

Video files

(e.g. QuickTime, Windows Media)

If you try to play an unsupported video file, you will be asked if you would like to search for a suitable codec. Click Search and, when the Install multimedia codecs window appears, select one of the codecs displayed in the list and click Install.

If you are asked to confirm installation of restricted software, the codec required to play your video may have some legal restrictions which you should be aware of. If you think that the restrictions do not apply to you, press Confirm to continue with the installation.

Once installation is complete, the video should begin to play. If not, try closing and then re-opening the video.

Flash videos

(e.g. Youtube, iPlayer)

When you first try to play a Flash video in the Firefox web browser, a bar will appear at the top of the window saying that additional plugins are required. Press the Install Missing Plugins button and follow the instructions on-screen to install a Flash player.

You will be offered the choice of several players. The Adobe Flash Player is the official plugin, which should offer the best support for videos. Unfortunately, it is proprietary software and so cannot be supported directly by Ubuntu. The Swfdec and Gnash players are not proprietary and so are supported. You may also find them to be more stable (cause fewer problems) than the official player.

Streaming video

(e.g. RealVideo)

The most reliable way of playing RealVideo-format videos is to install the official RealPlayer software. See Installing and configuring RealPlayer for full instructions.

Support for most other types of streaming video can be added by following the instructions for video files or Flash videos. If you are having difficulties getting a video to stream in your web browser, right-click the video and select Open with "Movie Player" if that option is available.

Videos that are otherwise unsupported

If none of the other instructions in this section work with a particular video, try using a different media player. VLC and MPlayer support a wide range of formats; it is recommended that you try one of these.


After you finish with the above process of installing restricted packagaes if you face an Error signal-

Just go to the terminal

login as super user or run following commands with sudo

apt-get update

apt-get upgrade

apt-get autoremove

apt-get autoclean

This will install some of the ttf-mscorefonts package if not installed properly in the process of installing restricted fonts from microsoft cross platform.

If your videos do not show up after upgrading to 9.04 just try this

  • Reverting the Jaunty Xorg intel driver to 2.4

The problem

As Described in X/Troubleshooting/IntelPerformance, some laptops with intel graphics hardware experience a serious performance degration after upgrading from intrepid to jaunty. The reasons for that are already explained on that page. This page explains how to revert the driver to the version in intrepid.

Installing the package

Add the following lines to your /etc/apt/sources.list:

 deb http://ppa.launchpad.net/siretart/ppa/ubuntu jaunty main
deb-src http://ppa.launchpad.net/siretart/ppa/ubuntu jaunty main

Import the appropriate GPG key:

 sudo apt-key adv --recv-keys --keyserver keyserver.ubuntu.com 0xce90d8983e731f79

See https://help.launchpad.net/Packaging/PPA#Adding%20a%20PPA%20to%20your%20Ubuntu%20repositories for additional information how to add GPG keys to your system.

Install the driver:

 $ sudo apt-get update
$ sudo apt-get install xserver-xorg-video-intel-2.4

Now you should be set. Restart X and see if the graphics performance from intrepid is restored.

Do I need to change my xorg.conf file? ==> May not work. Situation not improved without xorg.conf change??

Rolling back

If the driver does not work for you, or is not better, you should rollback to the original Ubuntu one. Remove the two lines from /etc/apt/sources.list again, and install the original one again:

 $ sudo apt-get install xserver-xorg-video-intel
If X.org does not start at all, you should change to a text terminal by pressing Ctrl+Alt+F2, logging in, and use "sudo nano" to edit /etc/apt/sources.list. After installing xserver-xorg-video-intel, restart the computer with "sudo reboot".

Adding shortcuts to the right click menu in Ubuntu

1. The first thing you need to do is install the Nautilus Actions application:

sudo apt-get install nautilus-actions

2. After it is installed, navigate to your System > Preferences menu and select Nautilus Actions Configuration

Adding Shortcuts to the right click menu in Ubuntu

You should now see the Nautilus Actions main screen

Adding Shortcuts to the right click menu in Ubuntu

3. Click the Add button and you should see the Add a New Action screen

Adding Shortcuts to the right click menu in Ubuntu

4. Fill out the Menu Item & Action properties with whatever you would like in your right click menu. Above, you can see I am using VLC as an example.

Next, click on the Conditions tab.

Adding Shortcuts to the right click menu in Ubuntu

5. Under the Conditions tab you need to make sure that Both is selected under “Appears if selections contains”.

Next, click on Advanced Conditions

Adding Shortcuts to the right click menu in Ubuntu

6. First, uncheck the “File / Local Files” box. Second, in order for the menu items you add to appear every time you right click, you will need to add a blank entry under the Advanced Conditions. To do this, click on the + and erase “new-scheme” and “new-scheme description” so that both entries are blank.

7. Click OK.

8. You now have added your first right click menu item. In order for the item to appear on your right click menu, you need to restart the nautilus daemon.

killall -HUP nautilus

Now you should be able to see the VLC media player on the right click menu.

Adding Shortcuts to the right click menu in Ubuntu

To continue adding more items to the menu, repeat steps 3 through 8 until you are satisfied.

Can not empty trash completely

At times t so happens that some files are deleted while in super user mode or in sudo command.
In such cases 'Empty trash' doesn't completely empties the trash as it has no super user rights or user authorisation.

In such cases from command prompt go to
/home/your_user_name/.local/share/Trash/

and use rm * command to delete all the files.
If there are any non empty folders then you will need to use

sudo rm -rf 'the folder name'

Enjoy Linux! Enjoy UBUNTU!!

Security on Ubuntu

Disclaimer

I am not a security expert at all. This is written strictly from the standpoint of an end-user who has had spyware and adware in Windows and who has read other users' advice (those users may or may not be security experts) about security practices in general.

This is not intended to be a comprehensive guide to what will absolutely provide you the best security or what theoretical ways your security can be breached. The point of this document is explain some basic, practical measures you can take to be relatively secure.

This is targeted at home desktop users. I know a very little about that, but I know nothing about securing servers.

Many of these principles can be applied to other Linux distributions as well, but the content is focused mainly on Ubuntu.

What are some security best practices?

I would suggest these at the very least (there are some measures you can take to go beyond this, but this is a good start):

  • Don't change any default settings with regard to networking unless you know what you're doing. If you decide to allow remote logins, for example, expect that people (people with malicious intent) will try to log in remotely and take control of your computer.
  • Use strong passwords for all users. Strong passwords tend to be longer than six characters and a mix of numbers, letters (both upper- and lower-case), and symbols. Strong passwords do not contain birthdates, addresses, or words in the dictionary.
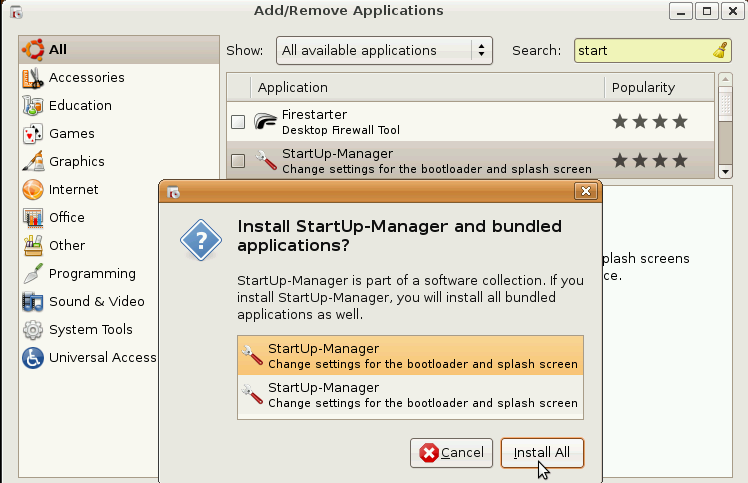
  • Don't install software from untrusted sources. Don't just download and compile any .tar.gz you come across through an internet search, unless you know it can be trusted. Generally, it's a good idea to stick to software you can install through Ubuntu's online repositories. If you want to know how to install software, read this guide. I've never known of any made-for-Linux software containing malicious code, but if you're super-paranoid...
  • Use the NoScript extension in Firefox. Of course, if you don't have Firefox, you may be able to achieve a similar functionality in your preferred browser, but the general idea is the same—a way to block JavaScript, Java, and Flash on all websites except those you explicitly approve. Most of Firefox's exploits are JavaScript-based. They tend to get patched pretty quickly, but why wait even the one day to a week it takes for a patch to come out?
  • Back up regularly. This goes for your important personal files and your system files (you can make an image of your entire installation if you want).
  • Don't be dumb. That's right. You can have your firewall all set up and encryption, etc., but if you're dumb, the battle is lost. A lot of security breaches come through social engineering. Don't give your password away. Don't click on links in emails. Don't open attachments from people you don't know. Don't be dumb.

So, do I need a firewall, anti-virus, anti-spyware tools?

By default, Ubuntu ships with no open ports on public interfaces. In other words, a "port scan" would show all closed ports, nothing open. As a result, putting up a firewall would provide no more security than not putting one up. Remember that open ports provide services that hackers can connect to, and only if they can connect to these services can they be potentially abused and exploited.

A firewall, however, adds the benefit of peace-of-mind from accidentally installing a server program that opens up a port by default. Also, it satisfies curiousity by logging potential "hits." Linux comes with a very strong, secure, and powerful firewall called iptables, but it is relatively difficult to use from a new user's standpoint. As a result, there are many graphical tools that give you a simple user interface for configuring iptables, such as Firestarter for GNOME or Guarddog for KDE. There are many more in the repository, too. Remember—these all use iptables in the background, so find your favorite interface—they all offer the same great protection. [These last two paragraphs contributed by jdong from the Ubuntu Forums. Thanks, jdong!]

Conventional wisdom in the Linux community says that there are either no or very few Linux viruses out in "the wild," and that most are just proof-of-concept theoretical viruses. Some people recommend installing a virus scanner like ClamAV in order to protect your Windows-using friends from Windows viruses you might accidentally send them. I don't really see how that's an issue, though. If you have an attachment you created in Linux, why would it have a Windows virus in it? If your computer has been compromised in such a way that you don't have control over what you send other people, then you have a lot more to worry about than spreading viruses to your Windows-using friends!

I've never heard of any spyware in Linux... ever. Still, if you're super-paranoid, stick to software in the repositories. And if you don't trust even the software in the repositories, why are you installing Ubuntu at all? The operating system and the software are packaged by the same people.

Some real dangers out there are rootkits and cracking. It doesn't happen often that a Ubuntu user gets a rootkit installed or has her computer cracked, but both have happened, and I've seen threads about them in the Ubuntu Forums. There are rootkit detectors in the repositories—rkhunter and chkrootkit, for example. I'm not sure what to do about cracking except some of the advice I gave before—stick with the default network settings unless you know what you're doing, and use strong passwords.

Is Ubuntu's security model stronger than Windows'?

Right now, as of Windows XP (and in Windows Vista, though it has UAC, which is a little better, though many Windows users disable the UAC prompts), Windows defaults to the first user being the computer administrator, so the user is able to accidentally (or, God forbid, through accidental approval/installation of a malicious program) modify systemwide settings.

Windows allows you to make it more secure by creating limited user accounts and using the Run As... option to run only particular tasks or programs as administrator (similar to the su feature in most Linux distributions). Run As... is crippled in its implementation, though. If you use Run As... to install Windows Updates, the updates do not install properly. Also, you have to find the particular launcher files (extension of *.cpl) for Control Panel applications in order to use the Run As... option on them. The way to run Explorer (the file browser) as administrator from within a limited user account is extremely complicated.

Unfortunately, in addition to Run As... being crippled, many third-party (not Microsoft) software companies design their applications to be run as administrator (since that is the Windows default, which is Microsoft's fault). Here is the Hall of Shame for programs that need to be run as administrator in Windows in order to function properly.

Ubuntu's default user operates as a limited user most of the time but has the ability (since she belongs to the admin group) to temporarily assume administrator (also known as root) privileges for particular tasks, and this setup is not only the default setup, but it is also fully functional—not crippled in any way.

So running as a limited user takes care of everything?

Not exactly. This is a common argument made by Linux users, that if you run as administrator, your whole system can be borked, but if you run as a limited user, only your personal files can be damaged.

While that's somewhat true, personal files are usually more important to a user than system files. After all, I can reinstall Ubuntu in half an hour and have it running again the way I want it to within two hours. If I lost all my personal files, it would take me months to recreate a lot of them, and some I would not be able to recreate at all.

This is why it's really important to back up whatever files are important to you.

Isn't using sudo essentially the same as running as root?

This is a common misconception about sudo among Linux-using non-Ubuntu users. When you run as root, anything you do has system-wide privileges. You can do anything. You have free reign over your entire system. This would be akin to walking around with everything you own, including all your money in cash on your person.

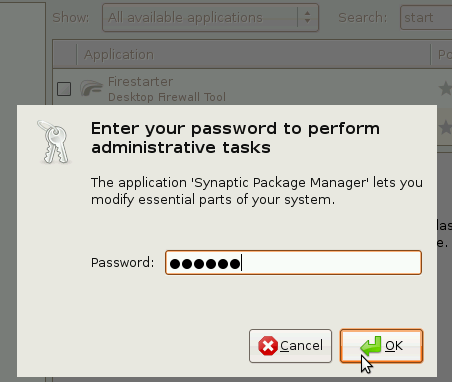
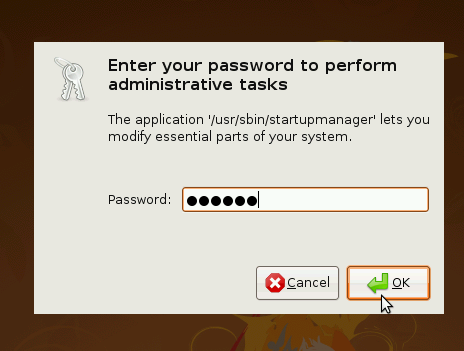
When you run as an admin in Ubuntu, you're almost always a limited user. If you preface a terminal command with the word sudo or preface a graphical command with gksudo or kdesu, you allow yourself (and only with password authentication) to temporarily assume root privileges for that one task. This would be like having your belongings in a safe with a combination lock or keeping all your money in a bank, where you can access your account through an ATM card and PIN code.

There is a fifteen-minute "timeout" for sudo. If you launch one command with sudo, you'll be prompted for a password, and within the same shell, you won't be prompted again for other sudo commands for the next fifteen minutes. If you want, you can change the sudo timeout to something lower so that you'll always be prompted for a password on every sudo command.

So anybody can assume root privileges with a password?

No. Only users in the admin group. The first user created during the Ubuntu installation will belong to the admin group. Any other users would have to be added to that group manually by the first user or another user in the admin group.

This whole sudo business makes no sense and isn't user-friendly

You're entitled to your opinion, of course, but many people consider Mac OS X to be one of the most user-friendly operating systems around, and it uses sudo.

Where can I read more about sudo?

http://help.ubuntu.com/community/RootSudo

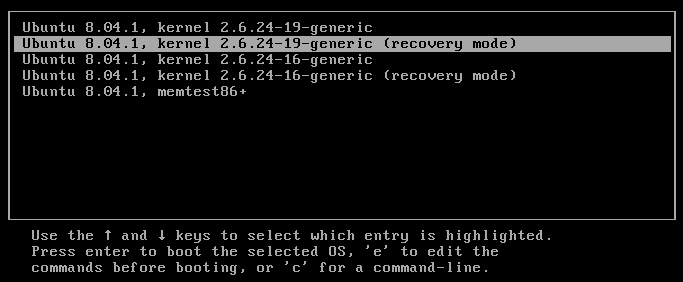
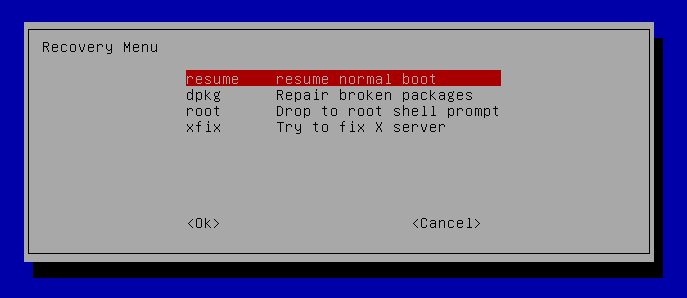
Recovery mode makes me root user. Isn't that a security risk?

Well, if you have several people using your computer, you can put small obstacles in their way by setting a root password, setting a Grub password, or setting a BIOS password. Still, anyone who has physical access to your computer and a little know-how practically has root access anyway. She can boot a live CD and mount your partition or even just physically remove the hard drive from your computer and put it in another computer. There's a certain amount of trust you automatically give anyone by allowing her to sit at your computer.

Is there any way to be 100% sure my computer will never be cracked into?

If you follow the instructions at the top of this page, you probably will not have your computer cracked. When you're connected to the internet, though, you are always vulnerable to security breaches of some kind. The only thing you can do is try to reduce your vulnerability. And I've read from a few security experts on the Ubuntu Forums that if someone is really determined to crack into your computer and capable, she pretty much will eventually—it's just a matter of time. The more obstacles you can put in the way of that happening, the more time it will take. Of course, disallowing remote logins is a big help.

What's the most important part of OS security?

The user. It's always the user. I'd rather have a smart user running as administrator on a Windows computer with no firewall, no anti-virus, and no anti-spyware than a dumb user running as limited user on a Ubuntu computer with a firewall, anti-virus, and a rootkit detector. Dumb users click on anything, somehow manage to install untrustworthy software even without administrative privileges, and use easy-to-guess passwords.

As an illustration, take a look at this excerpt from the Seinfeld episode "The Robbery," in which Jerry buys a secure "operating system," and Kramer plays the "dumb user."

ELAINE: [from the bathroom] JERRY! [enters the living-room] Jerry, oh, hi, welcome back. How were the shows?

JERRY: Great, I had fun, where's the TV, where's the VCR. [Elaine looks guilty] What?

ELAINE: They were stolen.

JERRY: Stolen? When?

ELAINE: A couple a hours ago, the police are coming right over.

JERRY: Stolen?

ELAINE: [Kramer enters the apartment] Someone left the door open. [it's clear that she means Kramer; she walks to the bathroom]

JERRY: [to Kramer] You left the door open?!

KRAMER: Uh, Jer, well ya know, I was cookin' and I, I uh, I came in to get this spatula...and I left the door open, 'cause I was gonna bring the spatula right back!

JERRY: Wait, you left the lock open or the door open?

KRAMER: [bobs his head guiltily] The door.

JERRY: The door? You left the door open?

KRAMER: Yeah, well, I was gonna bring the spatula right back.

JERRY: Yeah, and?

KRAMER: Well, I got caught up... watching a soap opera...[with a broken voice] The Bold and the Beautiful

JERRY: So the door was wide open?

KRAMER: Wide open!

JERRY: [Elaine enters the living-room] And where were you?

ELAINE: I was at Bloomingdale's...waiting for the shower to heat up.

KRAMER: Look, Jerry, I'm sorry, I'm uh, you have insurance, right buddy?

JERRY: No.

KRAMER: [looks shocked] How can you not have insurance?

JERRY: Because...I spent my money on the Clapgo D. 29, it's the most impenetrable lock on the market today...it has only one design flaw: the door...[shuts the door] must be CLOSED.

Text transcription from SeinfeldScripts.com

Mounting NTFS after unclean shutdown

To display your partition information type at command prompt.
sudo fdisk -l

The output will look like this:
*******************************************
Disk /dev/sda: 160.0 GB, 160041885696 bytes
255 heads, 63 sectors/track, 19457 cylinders
Units = cylinders of 16065 * 512 = 8225280 bytes
Disk identifier: 0xecd6ecd6

Device Boot Start End Blocks Id System
/dev/sda1 * 1 2550 20482843+ 7 HPFS/NTFS
/dev/sda2 2551 19457 135805477+ f W95 Ext'd (LBA)
/dev/sda5 2551 7649 40957686 7 HPFS/NTFS
/dev/sda6 7650 14023 51199123+ 7 HPFS/NTFS
/dev/sda7 14024 14351 2634628+ 82 Linux swap / Solaris
/dev/sda8 14352 19457 41013913+ 83 Linux
***************************************************************


To display your disk usage information type at command prompt.
df -h

The output will look like this:
************************************************************
Filesystem Size Used Avail Use% Mounted on
/dev/sda8 39G 11G 27G 29% /
tmpfs 497M 0 497M 0% /lib/init/rw
varrun 497M 384K 496M 1% /var/run
varlock 497M 0 497M 0% /var/lock
udev 497M 2.7M 494M 1% /dev
tmpfs 497M 104K 497M 1% /dev/shm
lrm 497M 2.0M 495M 1% /lib/modules/2.6.27-11-generic/volatile
/dev/sda5 40G 12G 28G 29% /media/disk
/dev/sda1 20G 17G 2.6G 87% /media/Local Disk
**************************************************************

Then to mount the partition forcefully
select appropriate partition number that is not mounting instead of /dev/sda6
mount -t ntfs-3g /dev/sda6 /media/sda6 -o force

This should solve your problem.

Configuring the Boot Menu in Ubuntu

While some users are comfortable editing the /boot/grub/menu.lst configuration file manually to change things like default operating system to boot or timeout time, other users may be more comfortable using a GUI (graphical user interface) to make such changes.

Start-Up Manager allows you to make changes to the boot menu through a GUI, and this guide shows you how to install Start-Up Manager.


First, go to Applications > Add/Remove


Under Show, make sure you've selected All available applications

Under Search, type the word start

In the filtered results, you should see StartUp-Manager. Check (or tick) the box next to it and then click Install all. I have no idea why StartUp-Manager shows up twice. Just ignore the second instance.


Click Apply Changes, and in the dialogue box that appears, click Apply.

When prompted, enter your password, and then wait for the files to download and install.


To start the newly installed Start-Up Manager, go to System > Administration > StartUp-Manager. You'll be prompted for your password (since you are, after all, changing system-wide settings).


If you want to change the default operating system (from Ubuntu to Windows, for example), just click the menu underneath Default operating system. You can explore other options to change, too.

How to reset your password in Ubuntu

There are many reasons you might want to reset a password:

  • Someone gave you a computer with Ubuntu installed on it but not the password for the user account.
  • You just installed Ubuntu and forgot what password you selected during the installation process.
  • You have too many passwords in your life and can't keep track of them all.
Well, this tutorial will help you reset your Ubuntu user account password, regardless of what reason you have for resetting it.

First, you have to reboot into recovery mode.


If you have a single-boot (Ubuntu is the only operating system on your computer), you may have to press the Escape key during bootup in order to see the boot menu. If you have a dual-boot (Ubuntu is installed next to Windows, another Linux operating system, or Mac OS X; and you choose at boot time which operating system to boot into), the boot menu should appear without the need to press the Escape key.


From the boot menu, select recovery mode, which is usually the second boot option.


After you select recovery mode and wait for all the boot-up processes to finish, you'll be presented with a few options. In this case, you want the Drop to root shell prompt option so press the Down arrow to get to that option, and then press Enter to select it.

The root account is the ultimate administrator and can do anything to the Ubuntu installation (including erase it), so please be careful with what commands you enter in the root terminal.

Once you're at the root shell prompt, if you have forgotten your username as well, type

ls /home
That's a lowercase L, by the way, not a capital i, in ls. You should then see a list of the users on your Ubuntu installation. In this case, I'm going to reset Linda Williams's password.

To reset the password, type

passwd username
where username is the username you want to reset. In this case, I want to reset Linda's password, so I type
passwd linda

You'll then be prompted for a new password. When you type the password you will get no visual response acknowledging your typing. Your password is still being accepted. Just type the password and hit Enter when you're done. You'll be prompted to retype the password. Do so and hit Enter again.

Now the password should be reset. Type

exit
to return to the recovery menu.


After you get back to the recovery menu, select resume normal boot, and use Ubuntu as you normally would—only this time, you actually know the password!

Note:
In pre-8.04 versions of Ubuntu, there is no recovery menu. Once you select recovery mode, it goes straight to a root shell. After you've reset your password, you can type

reboot
to get back to the regular boot menu and boot normally instead of selecting recovery mode.

Troubleshooting X

Sometimes new users, expecting a graphical environment after installing Ubuntu, end up at a black screen with some white text that has a login prompt. When they log in, they see this:

username@ubuntu:~$

I haven't experienced this myself, but I've seen it happen to other new users, either because they accidentally did a server install... or Ubuntu just did something funky.

Do you have a graphical environment installed?
The first step requires you to have a software repository. In most cases, if you're connected to the internet, the commands given will use your internet connection. If you don't have an internet connection but do have the Ubuntu Alternate Installer CD, insert it in your drive and type

sudo apt-cdrom add

This will add the CD as a software package source since you can't get packages from the internet.

To make sure you have a graphical environment installed:

sudo aptitude update
sudo aptitude install ubuntu-desktop

If you didn't already have it installed, you'll notice Ubuntu downloading and installing a whole bunch of packages, either from the internet or from your CD.

If you did have it installed, you'll simply be told ubuntu-desktop is already the newest version.

Run the graphical environment
Now that we have it installed, let's use it:

sudo /etc/init.d/gdm start

This should get you to a graphical login screen. If it says it's starting the GNOME Display Manager but after ten seconds or so... it doesn't actually appear to start, try pressing Control-Alt-F7, which should get you to the graphical login screen.

You have a graphical environment, but it won't show the way I want it to
Well, what if you get a graphical environment you can't see? It's a black screen but your monitor's working, or you get that the monitor signal is out of range, or the screen resolution is just too low for your tastes.

Well, then press Control-Alt-F1 and try this:

sudo dpkg-reconfigure xserver-xorg

This will pop up a text-based graphical "wizard" that will ask you questions about your keyboard, your mouse, your graphics card, and your monitor. Answer the questions as best you can. If you don't know the answer to a question, just go with the default and press Enter.

When you're done, press Control-Alt-F7 to get back to graphical mode and then Control-Alt-Backspace to reset the X server (so your changes can take effect).

Next steps
In a lot of cases, these steps will get you all straightened out. If not (for example, if you are still unable to reach your optimum screen resolution), look here for other possible solutions.

If you're still stuck at the command prompt but want to do some research on how to fix the problem, boot up the Desktop CD or install and use the text-only web browser called Lynx:

sudo apt-get update
sudo apt-get install lynx
lynx

Other variations
If you're using Kubuntu, it's the same deal--just replace ubuntu-desktop with kubuntu-desktop and replace

sudo /etc/init.d/gdm start
with
sudo /etc/init.d/kdm start

If you're using Xubuntu, it's the same deal--just replace ubuntu-desktop with xubuntu-desktop.

sudo /etc/init.d/gdm start
will stay as is.

ies4linux on UBUNTU

Here is a HowTo on installing and ies4linux

1. Install WINE(skip this step if you already have wine)
To do this, first add these repositories to your /etc/apt/sources.list file:
Code:
deb http://wine.sourceforge.net/apt/ binary/
deb-src http://wine.sourceforge.net/apt/ source/
Now upgrade your sources with "sudo apt-get update"

After upgrading, you are now ready to install wine. This step is easy, enter this into a terminal:
Code:
apt-get install wine
Now you have wine. The next thing you need to do is install cabextract.
Also Try to include winetools for more functionality.
2. Install Cabextract
To install cabextract, extract the follwing into your filesystem:
cabextract-1.1-1.i386.rpm
This should add some files to the /usr/bin folder and /usr/share folders and subfolders

3. Install ies4linux
Download the ies4linux tar file with this code:
Code:
wget http://www.tatanka.com.br/ies4linux/download.php
after that is downloaded, extract it and open the resulting folder. There should be a shell script called "ies4linux". Double click on it, and when prompted "run in terminal". You will now be in the download process, just follow the options there.

Recovering from Booting Problems using Live CD

This page describes methods for using the Ubuntu Live CD for recovering from different kinds of problems. If you do not have an Ubuntu disk, please refer to GettingUbuntu. If you have any issues booting the LiveCD, please have a look at the BootFromCD page. Most of the methods described below can also be used from RecoveryMode

Lost Password

Here is how you can use the Live CD to change the administrative password on your machine if you have lost/forgot the current password. Please note that you can usually boot into RecoveryMode and run the passwd command directly.

  1. Boot the Ubuntu Live CD.
  2. Press Ctrl-Alt-F1

  3. sudo mount /dev/hda1 /mnt

  4. Depending on your machine it could also be sudo mount /dev/sda1 /mnt. If you created a custom partition layout when installing Ubuntu you have to find your root partition using the fdisk utility. See the section Finding your root partition.

  5. sudo chroot /mnt

You can now use the passwd command to reset a password.

Note: In the mount command, /dev/hda1 will need to be replaced with the partition where the root of the file system resides.

Add User to a Group

If you have removed yourself from a group, you can use the following to add yourself again. Please note that you can usually use RecoveryMode and run the adduser command directly.

  1. Boot the Ubuntu Live CD.
  2. Press Ctrl-Alt-F1

  3. sudo mount /dev/hda1 /mnt

  4. sudo chroot /mnt

  5. adduser username groupname

Update Failure

If there was an update that made your system non-bootable and they have fixed it in the repositories, you can use the Live CD to run apt-get to get the new files to fix your system.

  1. Boot the Ubuntu Live CD.
  2. Press Ctrl-Alt-F1

  3. sudo mount /dev/hda1 /mnt

  4. sudo chroot /mnt

  5. apt-get update

  6. apt-get upgrade

Finding your root partition

If you created a custom partition layout during the Ubuntu installation, your root partition is probably not /dev/hda1 or /dev/sda1. If you do not know which partition corresponds to your root partition you can use the following procedure to find your root partition. We assume you have booted the live cd and are at the terminal.

  1. If you are not using a software raid setup or have setup your partitions using LVM/2 or EVMS your IDE/SATA/SCSI devices should be accessible through the files /dev/hd[a-z] and /dev/sd[a-z]. /dev/hda corresponds to the primary master device on your IDE bus, while /dev/sda is your first SCSI/SATA device. If you are using software raid, LVM, LVM2 or EVMS, your devices may be listed in the following directories:

    /dev/evms/dm     if you are using software raid
    /dev/evms/lvm if you are using LVM
    /dev/evms/lvm2 if you are using LVM2
    /dev/evms if you are using EVMS

    with their device (software raid) or partition name. You can learn more about Linux partitions here: http://tldp.org/HOWTO/Partition

  2. Now use the fdisk utility to list the partitions on a device. Let's assume that you installed Ubuntu to the fist IDE disk. Type the following:

    sudo fdisk -l /dev/hda

This will produce some output like this:

Password:

Disk /dev/hda: 120.0 GB, 120034123776 bytes
16 heads, 63 sectors/track, 232581 cylinders
Units = cylinders of 1008 * 512 = 516096 bytes

Device Boot Start End Blocks Id System
/dev/hda1 * 1 13206 6655792+ 7 HPFS/NTFS
/dev/hda2 13207 232581 110565000 5 Extended
/dev/hda5 228706 232484 1904616 82 Linux swap / Solaris
/dev/hda6 13207 228705 108611464+ 83 Linux
/dev/hda7 232485 232581 48856+ 83 Linux

Partition table entries are not in disk order

That means you have two standard Linux partitions on your disk: /dev/hda6 and /dev/hda7. You can now try to mount them and see if your Ubuntu installation is there. In this case /dev/hda7 is probably not the root partition, because it is only about 50MiB in size (see the Blocks column). Therefore we mount /dev/hda6:

sudo mount /dev/hda6 /mnt

Now show the files on the partition:

ls /mnt

If this command shows something like:

bin     dev      home      media     proc      sbin     tmp     var
boot etc lib opt root sys usr

it is a partition holding a Linux distribution. You can check if it really is Ubuntu (if you have multiple linux installations on your disk) using the following command:

cat /mnt/etc/lsb-release

That will give you some information about the distribution (if this file does not exist, it is probably not Ubuntu). If it is the wrong partition, just unmount it: sudo umount /mnt and try another partition on the same disk or choose a different partition on another disk (using fdisk as before).

Recover Grub

If you install some other system, or change drives and lose your Grub bootloader. For more information please have a look at the Grub page.

  1. Boot the Ubuntu Live CD.
  2. Press Ctrl-Alt-F1

  3. Find the partition where your /boot directory is (normally the root partition) check the previous tip for that.
  4. sudo mount /dev/hda1 /mnt

  5. sudo chroot /mnt

  6. grub

  7. find /boot/grub/stage1 (will output a partition name like (hd0,3) )

  8. root (hd0,3)

  9. setup (hd0)

  10. quit

  11. Now restart the system and remove the Live CD

The GUI Way: Reinstalling Grub

  1. Boot your computer with the Ubuntu CD
  2. Go through the installation process until you reach "[!!!] Disk Partition"
  3. Select Manual Partition
  4. Mount your appropriate linux partions:
    • /
    • /boot
    • swap
    • ...
  5. DO NOT FORMAT THEM.

  6. Finish the manual partition
  7. Say "Yes" when it asks you to save the changes
  8. It will give you errors saying that "the system couldn't install ....." after that
  9. Ignore them, keep select "continue" until you get back to the Ubuntu installation menu
  10. Jump to "Install Grub ...."
  11. Once it is finished, just restart your computer

JAVA on UBUNTU

Please do not make any edits to this article. Its contents are currently under review and being merged with the Ubuntu Server Guide. To find the Ubuntu Server Guide related to your specific version, please go to:

Sun Microsystems developed Java, which is many things depending on who you ask. It is a language, and an execution environment and probably many more things. On this page Java refers to the software that executes programs compiled to Java byte codes (akin to machine language).

Running Java under Ubuntu

In order to run Java programs and Java applets, you must have a Java environment installed. The GCJ flavor of Java is installed as default, and is usually fine for most purposes. If it is not installed, JavaInstallation describes how to install some opensource flavors of Java. You may, however, have a need to run the Sun flavor of Java if something does not work correctly.

To get Sun Java under Ubuntu 7.04 or later running on Intel or PowerPC platform, you should enable the Universe repository in Add/Remove programs, and install either the openjdk-6-jre package or the sun-java6-bin package. (Note: PowerPC version is slow).

To get Sun Java under Ubuntu 6.06 or 6.10 running on Intel x86 platform, you should enable the Universe repository in Add/Remove programs, and install the sun-java5-bin package.

Note: The same commands will work under Xubuntu/Kubuntu (using Add/Remove or the Adept Package Installer).

Choosing the default Java to use

Just installing new Java flavours does not change the default Java pointed to by /usr/bin/java. You must explicitly set this:

  • Open a Terminal window
  • Run sudo update-java-alternatives -l to see the current configuration and possibilities.

  • Run sudo update-java-alternatives -s XXXX to set the XXX java version as default. For Sun Java 6 this would be sudo update-java-alternatives -s java-6-sun

  • Run java -version to ensure that the correct version is being called.

You can also use the following command to interactively make the change;

  • Open a Terminal window
  • Run sudo update-alternatives --config java

  • Follow the onscreen prompt


MEDIUBUNTU in UBUNTU

Introduction

Medibuntu (Multimedia, Entertainment & Distractions In Ubuntu) is a repository of packages that cannot be included into the Ubuntu distribution for legal reasons (copyright, license, patent, etc).

Some of these packages include the libdvdcss package from VideoLAN and the external binary codecs package (commonly known as w32codecs) used by MPlayer and xine.

Disclaimer

Patent and copyright laws operate differently depending on which country you are in. Please obtain legal advice if you are unsure whether a particular patent or restriction applies to a media format you wish to use in your country.

See Ubuntu's Free Software Philosophy and the FreeFormats page for a more comprehensive discussion of these issues.

Free and Non-free Components

Medibuntu has two components for its repository. They are labelled free and non-free. The free component has the packages for software whose sources are made freely and/or are distributed with an open source license such as the GNU General Public License. The non-free component contains software whose sources are not made freely available and/or are distributed with a license that restricts certain ways the software can be distributed.

Software in the free component are not distributed in the Ubuntu repositories because of legal issues with that software in certain countries. Some software such as Amarok and Kaffeine are distributed through the main Ubuntu repositories but with certain functionalities taken away, again because of legal issues. Medibuntu distributes these kind of packages with those functionalities in place.

Software in the non-free component are not distributed in the main Ubuntu repositories because of the licenses that these software are distributed with restricts how they can be distributed. The software in the non-free component are usually not needed for general use as there are alternatives or implementations in other open source licensed software. Some software, such as Google Earth and Adobe Acrobat Reader, are available directly from the company's website that owns the rights to them.

Since the packages in the non-free component are usually not needed, the instructions in the next section will include a step to exclude acquiring package information from the non-free component of the Medibuntu repository.

Adding the Repositories

Below are the instructions to add the Medibuntu repository to your system's list of APT repositories. These are commands that should be run in the Terminal (Applications -> Accessories -> Terminal).

If you are new to Ubuntu, please see https://help.ubuntu.com/community/Repositories/Ubuntu for an overview of repositories.

Add Medibuntu to your sources.list, as well as its GPG key to your keyring. Make sure to use the correct sources.list that corresponds to your current distribution.

  • Ubuntu 9.04 "Jaunty Jackalope":

    sudo wget http://www.medibuntu.org/sources.list.d/jaunty.list --output-document=/etc/apt/sources.list.d/medibuntu.list
  • Ubuntu 8.10 "Intrepid Ibex":

    sudo wget http://www.medibuntu.org/sources.list.d/intrepid.list --output-document=/etc/apt/sources.list.d/medibuntu.list
  • Ubuntu 8.04 "Hardy Heron":

    sudo wget http://www.medibuntu.org/sources.list.d/hardy.list --output-document=/etc/apt/sources.list.d/medibuntu.list
  • Ubuntu 7.10 "Gutsy Gibbon":

    sudo wget http://www.medibuntu.org/sources.list.d/gutsy.list --output-document=/etc/apt/sources.list.d/medibuntu.list
  • Ubuntu 6.06 "Dapper Drake":

    sudo wget http://www.medibuntu.org/sources.list.d/dapper.list --output-document=/etc/apt/sources.list.d/medibuntu.list

Then, add the GPG Key:

sudo apt-get update && sudo apt-get install medibuntu-keyring && sudo apt-get update

You may be asked to accept this package even though it cannot be authenticated. This is normal; typing "Yes" means you trust Medibuntu.

Optional step : remove the non-free component

Some people don't want to install non-free software on their computer as explained in the "Free and Non-Free components" section. We will explain how to exclude getting packages from the non-free component of the Medibuntu repository.

You should understand that if you remove the non-free component, you will NOT have access to these packages:

  • acroread (Acrobat Reader -- not really needed because you can use free software, such as Evince, to read pdfs)
  • alsa-firmware -- needed for some audio cards
  • AMR and FAAC support in MPlayer and FFmpeg
  • googleearth
  • restricted video codecs (ppc-codecs, w32codecs, w64codecs)
  • Skype

the complete list of packages is here.

To exclude getting packages from the non-free component of the Medibuntu repository, type the following command:

sudo sed -e 's/ non-free//' -i /etc/apt/sources.list.d/medibuntu.list

Installing Individual Packages

Most Ubuntu users will only require a few packages from the Medibuntu repository; nonetheless, it's easier simply to add the repository to your setup as detailed above. The most common packages are libdvdcss2 for playing DVDs and the non-native codecs packages (w32codecs, w64codecs, ppc-codecs) for playing non-native media formats. If you wish to install individual packages, then follow the steps below.

  • With your favourite web browser, go to http://packages.medibuntu.org/.

  • Choose the Ubuntu version you're currently using.
  • Find the package for your architecture in the listing, and save it to your personal directory on your hard drive. You may need to also download any dependencies that are also in medibuntu.
  • Right click on the package you just downloaded.
  • Select Ubuntu Package Menu.
  • Choose Install Package.

Playing Encrypted DVDs

To play encrypted DVDs, the libdvdcss2 package is essential. libdvdcss is a simple library designed for accessing DVDs like a block device without having to bother about the decryption. Some more information about this package can be found at http://www.videolan.org/developers/libdvdcss.html.

Below are the instructions for installing the packages using the command line. For other methods, please refer to Installing Software.

With the entire Medibuntu repository

If you have added the entire Medibuntu repository, you just need to install the package using APT:

sudo apt-get install libdvdcss2

With individual packages

If your wish to install just libdvdcss2, you can first download the individual package and then install the package.

  • i386:

    wget -c http://packages.medibuntu.org/pool/free/libd/libdvdcss/libdvdcss2_1.2.9-2medibuntu4_i386.deb
    sudo dpkg -i libdvdcss2_1.2.9-2medibuntu4_i386.deb
  • amd64:

    wget -c http://packages.medibuntu.org/pool/free/libd/libdvdcss/libdvdcss2_1.2.9-2medibuntu4_amd64.deb
    sudo dpkg -i libdvdcss2_1.2.9-2medibuntu4_amd64.deb
  • powerpc:

    wget -c http://packages.medibuntu.org/pool/free/libd/libdvdcss/libdvdcss2_1.2.9-2medibuntu2_powerpc.deb
    sudo dpkg -i libdvdcss2_1.2.9-2medibuntu2_powerpc.deb

Playing Non-Native Media Formats

There are a few formats such as certain Windows formats, Real, and Apple Quicktime which do not have native codecs under Linux. To work around this issue, external binary codecs are used instead to play these formats. MPlayer and xine use such external codecs and these codecs are stored in the MPlayer website in their codecs directory located at http://www.mplayerhq.hu/MPlayer/releases/codecs/.

Medibuntu distributes a package which contains these codecs. The codecs are under the non-free component of the repository. If you followed the directions above to exclude the non-free component, follow the steps again to add the Medibuntu repository to your system's list of APT repositories and skip the step to exclude the non-free component.

Below are the instructions for installing the packages using the command line. For other methods, please refer to Installing Software.

With the entire Medibuntu repository

If you have added the entire Medibuntu repository, install the package using APT.

  • For i386, the package is called w32codecs:

    sudo apt-get install w32codecs
  • For amd64, the package is called w64codecs:

    sudo apt-get install w64codecs
  • For ppc, the package is called ppc-codecs:

    sudo apt-get install ppc-codecs
  • NOTE: This ppc-codecs package is currently only available for edgy and feisty. These codecs are also available from MPlayer and can be downloaded directly from http://www.mplayerhq.hu/MPlayer/releases/codecs/all-ppc-20061022.tar.bz2.

  • NOTE 2: the w64codecs is only made for feisty and later, so not for dapper or edgy

  • NOTE 3: the w32codecs can be used on amd64 ubuntu (hardy, intrepid) with the i386 mplayer, but it requires manual installation and forcing the install. The i386 mplayer executable can be extracted (and moved or renamed to mplayer32 to keep it separate from the 64 bit version), and will use the ia32 /usr/lib32 entries and w32 codecs - but updated libraries (e.g. libx264.so.59 v.s .57) may also be required.

With individual packages

If you wish to install just the individual external codecs package, you can first download the individual package and then install the package.

  • For i386, the package is called w32codecs:

    wget -c http://packages.medibuntu.org/pool/non-free/w/w32codecs/w32codecs_20071007-0medibuntu2_i386.deb
    sudo dpkg -i w32codecs_20071007-0medibuntu2_i386.deb
  • For amd64, the package is called w64codecs:

    wget -c http://packages.medibuntu.org/pool/non-free/w/w64codecs/w64codecs_20071007-0medibuntu1_amd64.deb
    sudo dpkg -i w64codecs_20071007-0medibuntu1_amd64.deb
  • For ppc, the package is called ppc-codecs:

    wget -c http://packages.medibuntu.org/pool/non-free/p/ppc-codecs/ppc-codecs_20071007-0medibuntu1_powerpc.deb
    sudo dpkg -i ppc-codecs_20071007-0medibuntu1_powerpc.deb

Reporting Bugs

Medibuntu has its own Launchpad page to report bugs and request features and other enhancements. To report a bug found in any package distributed with Medibuntu, file a bug report at https://launchpad.net/medibuntu/+filebug.

Donate

You can help Medibuntu with some donation. To donate, click on the Paypal donate button on Medibuntu homepage.

Links